一、Ansible 安装
管理员节点:
1
2
3
4
5
$ # Redhat/CentOS Linux上,Ansible目前放在的epel源中
$ # Fedora默认源中包含ansible,直接安装包既可
$ sudo yum install epel-release
$ sudo yum install ansible -y被管理节点:
1
不需要安装特殊的包,只需要python>2.4,RedHat Linux一般安装方式都是默认安装的。
二、Ansible 配置文件
ansible.cfg 配置文件作用
可以用来定义默认连接用户、端口号,优化连接速度等等。
ansible 配置文件不同段详解:http://www.ansible.com.cn/docs/intro_configuration.html#config-values-by-section
ansible.cfg 配置文件优化模板
1 | # ============================================== |
anbile配置文件的优先级
1 | Ansible 按照如下位置和顺序来查找 ansible.cfg 文件(1.5版本以后): |
三、Ansible Inventory
Inventory 是 Ansible 要管理对象的清单。在清单中,可以配置分组、主机信息等。
举个栗子:1
2
3
4
5
6
7
8$ vim /etc/ansible/hosts (默认路径)
[test1] # 组名
10.15.0.163 ansible_ssh_user="zhuqifei" ansible_ssh_port=2288 ansible_ssh_private_key_file="/home/zhuqifei/.id_rsa_ops"
[test2] # 组名
10.15.3.36 ansible_ssh_user="zhuqifei " ansible_ssh_port=2288 ansible_ssh_private_key_file="/home/zhuqifei/.id_rsa_ops"
也可以自定义 Inventory 文件,然后通过 -i 的参数指定。
Inventory 内置参数
| 参数名 | 参数说明 |
|---|---|
| ansible_ssh_host | 定义主机的ssh地址 |
| ansible_ssh_port | 定义主机的ssh端口 |
| ansible_ssh_user | 定义主机的ssh认证用户 |
| ansible_ssh_pass | 定义主机的ssh认证密码 |
| ansible_sudo | 定义主机的sudo用户 |
| ansible_sudo_pass | 定义主机的sudo密码 |
| ansible_sudo_exe | 定义主机的sudo路径 |
| ansible_connection | 定义主机连接方式;与主机的连接类型.比如:local,ssh或者paramiko;Ansible 1.2以前默认使用paramiko。1.2以后的版本默认使用‘smart’,‘smart’方式会根据是否支持ControlPersist,来判断ssh方式是否可行 |
| ansible_ssh_private_key_file | 定义主机私钥文件 |
| ansible_shell_type | 定义主机shell类型 |
| ansible_python_interpreter | 定义主机python解释器路径 |
四、Ansible 使用
介绍 ansible 命令行功能
1 | (常用) |
- ansible
1 | ansible <host-pattern> [-m module_name] [-a args] |
- ansible-doc
1 | ansible-doc [options] [module...] |
五、Ansible 常用模块与幂等性
常用的几个module模块
1 | 调试和测试类的module |
ping
这个 Module 的作用是测试机器的连通性。我们可以通过调用这个 Module,可以判断远程客户端主机是否在线。
相关例子:
1
2
3
4
5
6
7
8
9
10
11
12
13
14
15
16
17
18# 连接成功后会显示SUCCESS并返回 'pong'。
$ ansible -i hosts test1 -m ping
10.15.0.163 | SUCCESS => {
"ansible_facts": {
"discovered_interpreter_python": "/usr/bin/python"
},
"changed": false,
"ping": "pong"
}
# 连接失败后会显示 UNREACHABLE 并在 msg 中返回错误信息。
$ ansible -i hosts test1 -m ping
10.15.0.163 | UNREACHABLE! => {
"changed": false,
"msg": "Data could not be sent to remote host \"10.15.0.163\". Make sure this host can be reached over ssh: ssh: connect to host 10.15.0.163 port 22: Connection refused\r\n",
"unreachable": true
}setup
用来获取主机硬件信息及其他信息。1
2
3
4
5
6
7
8
9
10
11
12
13
14
15
16
17
18
19
20
21
22
23
24
25
26
27
28
29
30
31
32
33
34
35
3610.15.0.163 | SUCCESS => {
"ansible_facts": {
"ansible_all_ipv4_addresses": [
"10.15.0.163"
],
"ansible_all_ipv6_addresses": [],
"ansible_apparmor": {
"status": "disabled"
},
......
......
"ansible_swapfree_mb": 0,
"ansible_swaptotal_mb": 0,
"ansible_system": "Linux",
"ansible_system_capabilities": [],
"ansible_system_capabilities_enforced": "False",
"ansible_system_vendor": "OpenStack Foundation",
"ansible_uptime_seconds": 466,
"ansible_user_dir": "/root",
"ansible_user_gecos": "root",
"ansible_user_gid": 0,
"ansible_user_id": "root",
"ansible_user_shell": "/bin/bash",
"ansible_user_uid": 0,
"ansible_userspace_architecture": "x86_64",
"ansible_userspace_bits": "64",
"ansible_virtualization_role": "guest",
"ansible_virtualization_type": "openstack",
"discovered_interpreter_python": "/usr/bin/python",
"gather_subset": [
"all"
],
"module_setup": true
},
"changed": false
}copy
从当前的机器上copy静态文件到远程节点上,并且设置合理的文件权限。注意,copy module拷贝文件的时候,会先比较下文件的checksum,如果相同则不会拷贝,返回状态OK;如果不同才会拷贝,返回状态为changed。1
2
3
4
5
6
7
8
9
10
11
12
13
14
15
16
17
18
19
20
21
22$ vim hello_zqf
hello zhuqifei !!
$ ansible test1 -m copy -a "src=hello_zqf dest=/opt/hello_zqf_copy mode=0644"
10.15.3.36 | CHANGED => {
"ansible_facts": {
"discovered_interpreter_python": "/usr/bin/python"
},
"changed": true,
"checksum": "8f757bf9cba9a7ec1d89f640ad045f7324b7fwea7",
"dest": "/opt/hello_zqf_copy",
"gid": 0,
"group": "root",
"md5sum": "8854f4d091437b07b96b47f70d62d5ca",
"mode": "0644",
"owner": "root",
"size": 28,
"src": "/home/zhuqifei/.ansible/tmp/ansible-tmp-1602501032.88-19490-228871563106293/source",
"state": "file",
"uid": 0
}
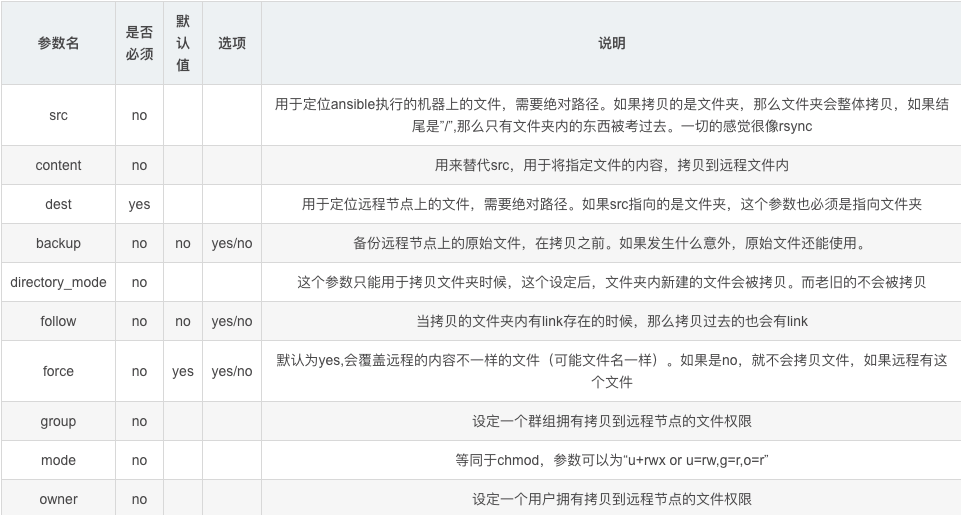
- template
如果你需要拷贝一个静态的文件,那么用copy module就够用了。但是如果你需要拷贝一个文件,并且需要修改部分内容,那么就需要用到template module啦。1
2
3
4
5
6
7
8
9
10
11
12
13
14
15
16
17
18
19
20
21
22
23
24
25
26$ vim hello_zqf.j2
hello {{ dynamic_word }} !!
$ ansible test1 -m template -a "src=hello_zqf.j2 dest=/opt/hello_zqf_template mode=0644" --extra-vars="dynamic_word=zhuqifei"
10.15.3.36 | CHANGED => {
"ansible_facts": {
"discovered_interpreter_python": "/usr/bin/python"
},
"changed": true,
"checksum": "c01f87bababc49bdd9e617dcd391c4209303b8ed",
"dest": "/opt/hello_zqf",
"gid": 0,
"group": "root",
"md5sum": "e55afdc802d9912266811ed17b3d5088",
"mode": "0644",
"owner": "root",
"size": 18,
"src": "/home/zhuqifei/.ansible/tmp/ansible-tmp-1602500948.89-17460-59368747945805/source",
"state": "file",
"uid": 0
}
# 可以看到源文件中 {{ dynamic_word }} 变量被替换为指定的变量值了。
$ cat /opt/hello_zqf_template
hello zhuqifei !!

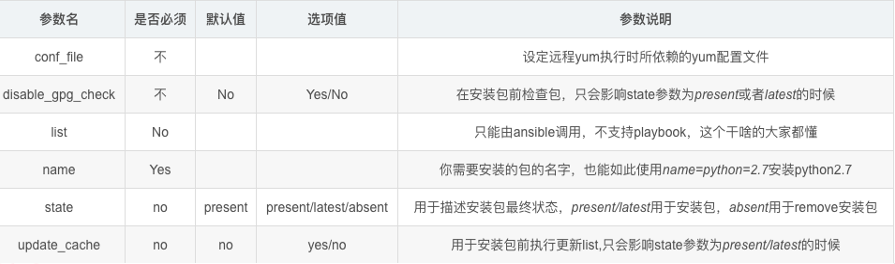
- yum
yum module是用来管理red hat系的Linux上的安装包的,包括RHEL,CentOS,和fedora 21一下的版本。fedora从版本22开始就使用dnf,推荐使用dnf module来进行安装包的操作。
安装最新版本的包1
2
3
4
5
6
7
8
9
10
11
12
13
14
15
16
17
18
19
20
21
22
23
24
25$ ansible -i hosts all -m yum -a “name=nginx state=latest” --become-user root --become
10.15.3.36 | CHANGED => {
"ansible_facts": {
"discovered_interpreter_python": "/usr/bin/python"
},
"changed": true,
"changes": {
"installed": [
"nginx"
],
"updated": []
},
"msg": "",
"obsoletes": {
"iwl7265-firmware": {
"dist": "noarch",
"repo": "@base",
"version": "22.0.7.0-72.el7"
}
},
"rc": 0,
"results": [
"Loaded plugins: fastestmirror\nLoading mirror speeds from cached hostfile\nResolving Dependencies\n--> Running transaction check\n---> Package nginx.x86_64
......
......
command
在远程主机执行命令1
2
3
4
5$ ansible -i hosts all -m command -a "hostname"
10.15.3.36 | CHANGED | rc=0 >>
zqf-ansible-test-0001
10.15.0.163 | CHANGED | rc=0 >>
zqf-ansible-test-0002service
管理远程节点上的服务,什么是服务呢,比如httpd、sshd、nfs、crond等,等同于Linux下的service命令。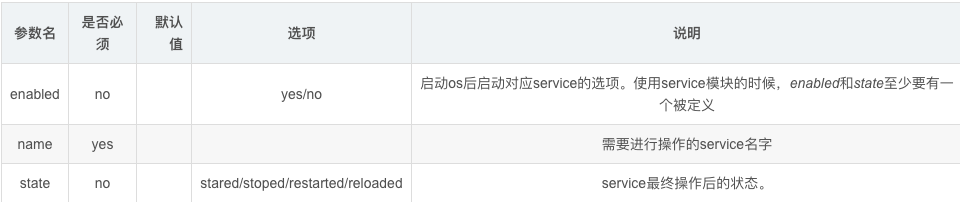
更多模块
https://github.com/ansible/ansible/tree/devel/lib/ansible/modules
执行过程及原理说明
1、加载配置文件,默认是/etc/ansible/ansible.cfg
2、加载对应模块
3、生产临时py文件,并传输到目标机器的~/.ansible/tmp目录下
4、给py文件加上+x权限,执行并返回结果
5、删除py文件并sleep 0 退出
什么是幂等性?
幂等性是数学和计算机科学上一个常见的概念,多次执行产生的结果不会发生改变,这样的特性就被成为幂等性。
Ansible 包含众多的模块,大部分模块都能够保证操作的幂等性,既相关操作的多次执行能够达到相同结果这一特性,但是也有不满足幂等原则的,比如shell模块和row模块。